Thursday, December 6, 2018

Mia Minimalist minimalist wallet

I am quite amazed from the lifestyle and fashion design of living-less concept.  This wallet sewing pattern is inspired from the minimalism fashion.  It is clean, simple but carry some design elements to it instead of large and bulky long wallet.  It is really light to carry and instantly feel the freedom within yourself when you have this in your tote. 


Mia minimalist wallet is really a really fun to sew and functional minimalist wallet that lets you bring the essentials wherever you go.

By choosing different leather strap and fabric accent combination, you will surely create plenty of sophisticated details. 


It is pretty flat but roomy wallet that offer  a zippered pocket at the cover for your coins and and 2 card slots to cards organized (4 cards possible), while another larger pocket behind provides good size for cash notes, receipts or small documents in place.   It is also quick and simple to make.  


The dimension of this wallet is 
4” (H) x 5” (W).  Find out more at my Etsy (click on any photos below to lead you to my shop)  or Craftsy shop at the link here >  


Interior


 Back view

https://www.etsy.com/listing/658878751/vegan-style-minimalist-wallet-sewing?ref=shop_home_active_5


After testing my pattern, I quickly made another 2 Mia wallets and really enjoy the process of sewing.  It was really great fun to sew this wallet and I am really happy with the results.


Friday, September 28, 2018

Let's sew applique on your bag !


This is my way of sewing appliqué to my bag projects, without the use of freezing paper.  I am demonstrating appliqué sewing using my new Little House Round wallet Sewing Pattern (available now in my Etsy or Craftsy shop).  Hoping it would assist anyone who love appliqué sewing in their future works.  Have fun !  (^o^)v


1. Cut out the appliqué and outline the design as shown in photo below.


You will get the result below.  Sew according to the sequence provided by the sewing pattern.

(Tip : Do not cut out the bag body main fabric at this stage; normally the main fabric will shrink after sewing up the appliqué, I would suggest you to complete sewing up all the appliqués, then use the bag body pattern to re-measure main fabric and cut it at that stage)


2. Sewing the clouds (1) & (2)
Cut out the cloud patterns; transfer cloud (1) to its fabric.
At the same time, draw a ¼” seam allowance (red line). Cut out the cloud based on the seam allowance. 


(Tips :  for any appliqué pattern that is round in shape, always cut the fabric on the bias (photo below))


Note that I also give a little seam allowance (yellow line below) for me to sew Cloud (2) later.


Make small cuts at the curved in area of the cloud (photo below).
Pin cloud (1) onto the outline of main fabric.


  Use the needle to “scrapping” the seam allowance inward according to the outline then press it using your thumb.  Start sewing the cloud onto the main fabric (photo below).  Continue this process to complete the appliqué.

3. Sewing the chimney and trees.
If you have problem sewing mini item like the chimney, you can always embroider it.  Using Step (2), sew the trees onto the main fabrics.


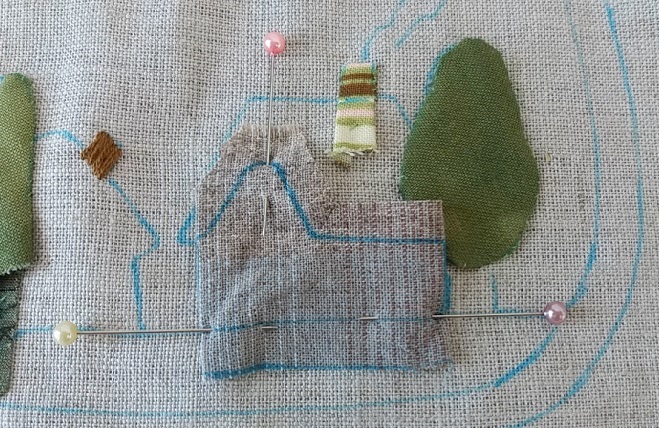
4. To Sew the little house
Transfer one of the little houses pattern onto the appliqué fabric, remember to also draw the ¼” seam allowance (it doesn’t need to be perfect, highlighted below)

Using the same house pattern, outline as shown in photo below.

Using the same house pattern, outline as shown in photo below.


Pin and sew the appliqué fabric as shown below.

5. Sewing the roof top, Pattern (10)
Transfer roof top pattern onto its fabric, remember to include the seam allowance.  Cut out the fabric.  Make a few small cuts as highlighted in blue lines below. 
Pin and sew the fabric onto the outlined roof top (photo below).

6. Sewing the land
Transfer the land pattern to the main fabric and the appliqué piece( highlighted in photo below). 


Sew the land to get to the result below.  

Using embroidery thread, sew the smoke using running stitch.  

Re-measure the main fabric with the bag body pattern, cut out the main body fabric. (photo below).


The appliqué session for this sewing pattern is completed. Set aside. You are ready to start the bag making steps next. ^v^

Thursday, July 12, 2018

Simply chic and compact 2 zippers mini pouch


Adapting minimalist but functional way.  Less is always more.  This mini pouch is designed to be chic and compact zipper pouch that is perfect for your daily errands.   It is really quick to make and really cute to tag along, and it is surely going to make perfect gift(s).


♥  chic and versatile , simply choose your cute fabrics to create a different appearance to your project

♥ Padded with interface making it comfortable to hold and provide a sturdy shape.

♥  2 zipper pockets and 1 additional back pocket to organize your cash, coins, cards ♥  definitely makes a perfect gift

♥  A key ring strap to hold your key.


Click on any of the photos below to lead you to my Etsy shop or click on the link below if for Craftsy users


You will surely enjoy making this pouch  ! ^v^

Tuesday, April 10, 2018

Flap Over Zipper Square Pouch pattern

If you are seeking to make a pouch that reveals chic and simplicity, then you should really get this pattern to make this cute flap over zipper pouch.

This sizable pouch is perfect choice for carrying on hands


it offers adequate space to put in your essentials. You will find 1 main zipper compartment for your daily essential and a flap over cover pocket for your credit cards, cash and coins. 


All you need is really simple to get materials to start this project.
♥ Front fabrics (I am using light weight canvas)
♥ medium weight (medium soft) interface 
♥ 10 (1/4)” (26. cm) zipper 
♥ 2 pieces - bias strap lining fabrics 1 ½” x 19.5” (4cm x 49.5 cm)
♥ 2 rivets and tools to install the rivets or button snaps (1.2cm in diameter)
♥ An O ring or D ring (2.5cm) or a pair if you wish to turn this pouch into a sling bag
♥ Sewing materials, sewing machine and water soluble pen, of course !


The original pattern assist you to make this pouch into a key ring bag, however, If you have a ready sling belt, you can also turn this pouch pattern into a really cute sling pouch.  The creativity is really in your hands.  (you can make it into a children's sling pouch too)

Approximate measurement :
4” (H) x 6” (W) x 2.5” (D)


It is really a great bag size for multiple usages (traveling, cosmetic, toiletries, makeup, accessory, gadget pouch etc)
Simply click on any of the photo above to lead you to this pattern. 

Have fun sewing !  ^v^


Thursday, March 15, 2018

How to install rivets


I found this list of photos really good as reference for rivet button installation.  I am translating this tutorial into English for your reference.

Here is one of the rivet / snap closure installer commonly use for leisure project (I am using heavy duty puncher tool though). 


Metal Snap Closure and Dies Set
You will need the following tools to install snap button :
·     A  ( CAP), B (SOCKET), C (POST), D ( STUD), with A & B  and C & D form a pair respectively.  Setter  - a metal stand to hold the snap button to be punched (photo bellow)


·     T1 is used for poking a whole while  T2, T3 (photo below) are the dies tool(An awl is also a good tool to poke a hole).


·     A hammer.


Wednesday, February 28, 2018

Shortening your zipper (without zipper tabs version)

 This method to shorten the zipper is intended for projects that do not require fabric tabs at both ends of zipper.
1.      Measure the desired gross length of the zipper for your project.
2.      Mark 2 lines at the both ends of the zipper, with 1 represents the actual length while the other line represents the seam allowance (click to enlarge photo below)


3.      Make sure the zipper puller is within the area you'll use and won't be cut off.
4.      Using zigzag stitch (or hand stitch) at the open end of the zipper, sew a few lines within the seam allowance to close the zipper end.
5.      Trim the excess zipper (click to enlarge photo below)