Thursday, September 7, 2017

Substantial and stylish quilted everyday long wallet pattern


This is just a substantial and super stylish wallet sewing pattern or an on-the-go coin purse to keep your cash or credit cards in order beside inject a little personality into your daily essentials.  And this pattern is available in my shop now 


(for enquiry : storyquilter@gmail.com)


You will receive clear step by step 14 pages of photo illustrated PDF Pattern instantly with 2 pattern templates, after your payment completed. Also a bonus tutorial to sewing bias tape (photo illustrated too). Please be informed that this sewing pattern is written in English.
Very simple materials required to make something beautiful (^u^)


All you need are just very simple materials from your sewing studio ! 


♥ lining and cotton fabrics, (if you have a lot of scrap fabrics that's just too beautiful to let go, this is definitely the sewing project to make full use of your fabrics).
♥ fusible interface (just 1 small piece but optional)
♥ Linen fabric, lining and batting 14 (1/2)” x 9 (1/2)”
♥ 1 piece of 8“ zipper
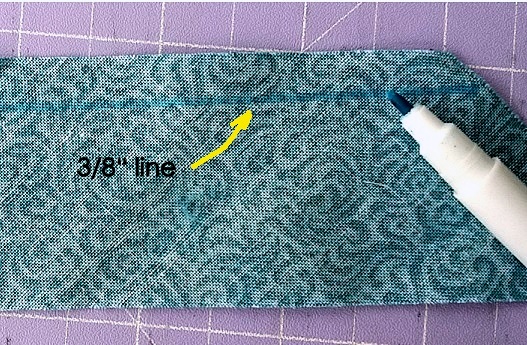
♥ sewing materials and water soluble pen
& of course, your passion to sew 


 Features of this (as shown in photo)

♥ substantial wallet to keep your credit cards and cash, iphone etc in order. Most importantly, it is super stylish!
♥ multipurpose usage as everyday wallet, night out wallet, travel organizer and definitely a great gift ! I made one for my sister too ( the green wallet in last photo ) and she loves it really really so much ! ^v^ )
♥ Padded and quilted with interfacing that is light to carry and comfortable to hold
♥ 6 card pocket compartments that hold up to 4 cards (of course, you can slot in 2 cards in each pocket too).
♥ 1 big pocket for your notes, receipts, travel ticket etc
♥ 1 big compartment for your electronic gadget, passport, shopping list notepad and pen, check book and even a small lipstick or compact powder.
♥ 1 big zipper pocket at the back to hold your cash and coins, even some keys (not too bulky).


Choose your favorite fabric and try out to see how you can wonderful wallet using this pattern.


Approximate Dimension :
4 (3/4)” x 8” (11cm x 20.5 cm )
When closed (flat) 8” x 8” (20.5 x 20.5) when opened


You will surely end up loving to make a lot of this wallet, and of course to use it !

Check it out at my Etsy shop or click on any of the photo above to lead you to this beautiful wallet pattern ^v^


Sunday, September 3, 2017

How to sew bias tape or sewing up the binding onto your quilting project.

How to hand stitch bias tape or sewing up the binding onto your quilting project.

I prefer to make my own bias tape basically for only 4 reasons

1.      I don’t need to keep many bias tape makers for different width of bias tape.
2.      I can get the suitable fabric for my bias tape.  Sometimes it is just hard to find the right bias tape that suits my project.
3.      I can make full use of my scrap fabrics and finally
4.      It is simple to make   ^v^


I am using one of my sewing patterns to explain this step in detail. You can also use this as a reference machine sewing bias tape strap onto your quilted project. Without further ado, let’s get started.

1.     You will need to cut out the fabric “on the bias”, which means to cut out the fabric at the required width and length from the big fabric piece diagonally.  If you are cutting out the bias in parallel, it is ok when you are bias taping square shape project, but when comes to project that has round corner, you will have problem getting smoother surface when sewing the bias tape.  So cutting the fabric on the bias will solve this problem

2.  Here is my bias tape fabric. Pin the end of each strip perpendicular as shown in photo below, draw a diagonal line (sewing line) at the wrong side of fabric strip, at the same time, draw a ¼” line as the seam allowance.


3. Sew a line as shown in photo below.  Trim the seam allowance.


 4.      Press the seam open (photo below).


5.      If you are hand sewing the binding or bias tape, you will need to draw the seam line before hand onto the back side of your binding fabric.  If you are using machine sewing, you can ignore this step.


6.      Start by folding a seam from the raw edge.


7.      Choose your starting point; start pinning your bias tape onto the quilted project. Pin your bias tape to the FRONT SIDE of your quilted piece.


How to bind square corner


Binding a bias tape onto round shape quilted project is so much easier than square edges one.  I am sharing my way to sew bias tape onto mitered corner here, hopefully it will be useful tips for your future projects ^v^.


1.      Place your quilt in vertical position. Fold the binding up to make a 90 degree angle between the pinned bias tape and the loose binding (photo below). Using your finger, press the folded area to create a crease (yellow arrow, photo below).


2.      After that, fold the loose end downs so that the folded end is aligned with the quilted piece (photo below).  Pin the folded area, then you can continue pinning the rest of the bias tape.


3.      Pin all the areas as shown below.


4.      When you finally reached the ending point, allow the loose end to overlap with the starting point of the bias tape by 1 (1/2)”.  Photo below.


5.      Start stitching the bias tape onto the quilted piece.


6.      When you reached the seam allowance of the top edge (of square corner), make a back stitch here.


7.      Sew through the folded area, perform a back stitch at the seam allowance, and continue your sewing from here.


8.      When you reached the end point, make a back stitch again or make a knot to end the sewing.

9.      Turn your quilted project to the inner side, double fold the bias tape onto its seam, then pin it onto the quilted piece.


10.  When you reached the square corner, press the seam out , then press the loose seam up and pin it to cover the corner .  Continue double fold and pinning the bias tape onto your entire quilted piece.


11.  Start sewing the bias tape as shown in photo below until the ending point. Make a knot and seal it into your quilted piece.


That’s how I hand stitch my bias tape when I run into situation I can’t use machine sewing.  I hope my tutorial helps you in your future projects.  Although it is hand stitch process but I think it is still lots of fun.

Happy sewing to you !


Cheers ^v^