Showing posts with label purse pattern. Show all posts

Friday, September 28, 2018

Let's sew applique on your bag !


This is my way of sewing appliqué to my bag projects, without the use of freezing paper.  I am demonstrating appliqué sewing using my new Little House Round wallet Sewing Pattern (available now in my Etsy or Craftsy shop).  Hoping it would assist anyone who love appliqué sewing in their future works.  Have fun !  (^o^)v


1. Cut out the appliqué and outline the design as shown in photo below.


You will get the result below.  Sew according to the sequence provided by the sewing pattern.

(Tip : Do not cut out the bag body main fabric at this stage; normally the main fabric will shrink after sewing up the appliqué, I would suggest you to complete sewing up all the appliqués, then use the bag body pattern to re-measure main fabric and cut it at that stage)


2. Sewing the clouds (1) & (2)
Cut out the cloud patterns; transfer cloud (1) to its fabric.
At the same time, draw a ¼” seam allowance (red line). Cut out the cloud based on the seam allowance. 


(Tips :  for any appliqué pattern that is round in shape, always cut the fabric on the bias (photo below))


Note that I also give a little seam allowance (yellow line below) for me to sew Cloud (2) later.


Make small cuts at the curved in area of the cloud (photo below).
Pin cloud (1) onto the outline of main fabric.


  Use the needle to “scrapping” the seam allowance inward according to the outline then press it using your thumb.  Start sewing the cloud onto the main fabric (photo below).  Continue this process to complete the appliqué.

3. Sewing the chimney and trees.
If you have problem sewing mini item like the chimney, you can always embroider it.  Using Step (2), sew the trees onto the main fabrics.


4. To Sew the little house
Transfer one of the little houses pattern onto the appliqué fabric, remember to also draw the ¼” seam allowance (it doesn’t need to be perfect, highlighted below)

Using the same house pattern, outline as shown in photo below.

Using the same house pattern, outline as shown in photo below.


Pin and sew the appliqué fabric as shown below.
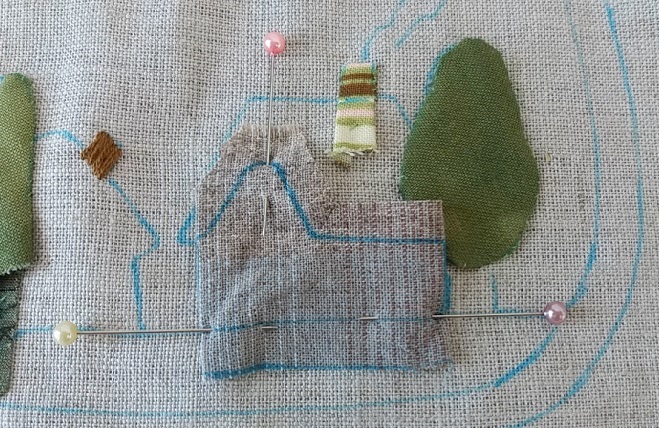
5. Sewing the roof top, Pattern (10)
Transfer roof top pattern onto its fabric, remember to include the seam allowance.  Cut out the fabric.  Make a few small cuts as highlighted in blue lines below. 
Pin and sew the fabric onto the outlined roof top (photo below).

6. Sewing the land
Transfer the land pattern to the main fabric and the appliqué piece( highlighted in photo below). 


Sew the land to get to the result below.  

Using embroidery thread, sew the smoke using running stitch.  

Re-measure the main fabric with the bag body pattern, cut out the main body fabric. (photo below).


The appliqué session for this sewing pattern is completed. Set aside. You are ready to start the bag making steps next. ^v^

Thursday, July 12, 2018

Simply chic and compact 2 zippers mini pouch


Adapting minimalist but functional way.  Less is always more.  This mini pouch is designed to be chic and compact zipper pouch that is perfect for your daily errands.   It is really quick to make and really cute to tag along, and it is surely going to make perfect gift(s).


♥  chic and versatile , simply choose your cute fabrics to create a different appearance to your project

♥ Padded with interface making it comfortable to hold and provide a sturdy shape.

♥  2 zipper pockets and 1 additional back pocket to organize your cash, coins, cards ♥  definitely makes a perfect gift

♥  A key ring strap to hold your key.


Click on any of the photos below to lead you to my Etsy shop or click on the link below if for Craftsy users


You will surely enjoy making this pouch  ! ^v^

Thursday, April 14, 2016

Good books to recommend.

If you are looking for very simple projects or a pure beginners and wish to explore the world of bag makings,  please feel free to visit my Etsy shop for the handmade bag projects at the link below or just click on the photos below to link you to the site. ^u^


Thursday, February 12, 2015

Hello Kitty clutch Purse with cover sewing pattern

I collected this Hello Kitty linen fabric during my 3rd trip to Tokyo.  I haven’t got any plan what to do with this fabric yet until a friend suggested me to make a wristlet for her. Then I thought of using this Hello Kitty fabric.  I am sure it is going to be a very cute wristlet purse. 

I have got an idea what to do now.  Next is to make a design that match to this cute fabric.  I started to draw my own pattern and the steps required to make this purse to be as easy to make as possible.  To my amazed, my steps are easy, thank GOD !!!   

Hmmm … let see, I think I am going to add a wristlet to it to make this purse even more chic and smart.  I think a decorative Chanel chain would suit this purse perfectly.  So I am making it using a navy blue ribbon.


I just want to make this clutch purse to be as perfect as possible.  Now I am hunting for a Hello Kitty accessory in my accessory drawers …. Yes, found it !!!  This is going to make this purse into a more unique purse. 


Viola !!  Finally !  I am sure
my friend would fall in love to this purse immediately.


Feature of this clutch purse ^v^

Quilted for comfortable hold


Zipper pocket at the front for your coins or card 


Back pocket secured with sticky tape


Inner pocket for organizing your cash, phone or cards


As for the wristlet, it is a very personnel design.  As a result, my pattern won’t cover this step.  However if you have a ready wristlet, you can always add a little accessory to it.  You can also use it as a key holder as shown below.


Please feel free to visit my Etsy shop also remember to favorite my shop so that you can see more and more update of patterns or handmade goods from my shop, it is just a click at the link below  ^v^


Features of this purse
Quilted for comfortable hold
Inner pocket for organizing your cash, phone or cards
Zipper pocket at the front for your coins or card
Back pocket secured with sticky tape

As for the wristlet, it is a very personnel design.  As a result, my pattern won’t cover this step.  However if you have a ready wristlet, you can always add a little accessory to it.  You can also use it as a key holder as shown below.


If you are interested to purchase this pattern, please feel free to email me at 
StoryQuilter@gmail.com

or visit my Etsy shop at the link below. 

https://www.etsy.com/shop/storyquilt

Sunday, July 13, 2014

Puffy Shabby Chic Clutch Purse

I really love clutch purses since i was a little kid.  When I grow older and exposed myself to bag making, I foundwith a simple clutch frame, based on their size and shape,  you can really make beautiful purses , all you need to do is to design it.  I am making this one as a start for my clutch purses project.   I believe slowly I will be designing more and more clutch purses from Japanese country style purses to vintage design like this one.   ^v^ 


Here is the back of the purse.  I chose to use different fabric for the back side of the purse because it adds more color to the purse body.  Apart from that, the corsage of my clutch purse is detachable, I can simple attach it to the front and back of my purse whenever I wish.  This idea creates more room for me to use the purse (I don't have to keep looking at the same purse all the time :p)

This little beginner project is really simple to make, probably you can finish it within a day if you are fast enough.    Here it is, my Shabby Chic Puffy clutch purse.   


Besides the purse pattern, I also showed you how to making simple corsage as shown in the photos below.


If you are interested in the pattern, please feel free to visit my Etsy shop here

Tuesday, May 27, 2014

Double zipper long purse sewing pattern

I’ve had serious craving to try my way of making a double zipper pouch.  After few round of testing, I finally get the measurement and methods right, in a faster and easier method of course!

While testing my instructions to make this purse, I thought of making something more unique than the normal purse, that is to use multiple fabrics for the card pockets.  And my idea works well in my pattern.  When I showed this purse to my friends who came over to my house for coffee break last weekend.  They were all surprised by the interior of my purse and they found that using multiple fabrics actually added so much more character and surprises to a purse.  I really feel so happy for the result.  I have got a lot of ideas in mind now but so far, let’s make this style as the start.

Purse making is really full of fun, when you changed the fabric style, it will change the character of your purse too.  Like this purse, I chose Japanese zakka and vintage style, the result is beautiful.  You can also try as many style as possible using this purse pattern from shabby chic to retro to sporty style. Just play with the pattern, you will surely be amazed with your creations.

Here is my latest double zipper purse.  


The purse pattern has 2 zipper compartments for coins and some other loose items / documents.  


There are 6 card pockets and 2 large pockets for your money or check book too.  


If you are interested in the purse pattern, please feel free to check it at my Etsy shop.  More details about this pattern in the link below ^v^

http://www.etsy.com/listing/191038656/double-zipper-long-purse-wallet-pdf?ref=shop_home_active_1


Monday, April 28, 2014

Very fashionable and girlish purse sewing pattern available in my Etsy now !

Last year in December, I made my 7th visit to Japan , I like this country so much because it has so many ideas to offer to someone like me ^u^ .  I found that in Japan, most of them are using long purse with many compartments and card pockets.  This idea is really good as it keeps your money and personnel documents well organised.  Since then, the idea of making a long purse pattern has always in my mind.

And yesterday, I have completed this mission !!  (fulfilling) 


I have made this into a pattern because I know for sure a lot of friends out there will be so happy to have a unique purse made by themselves.  All you need to do is choose the fabrics you like and just start sewing using my pattern in my Etsy shop.
You can also change the strap to make this purse into a sling bag and it is going to be very stylish too

So here is my work …. *v*, I hope you will love the idea


To view more of my works, kindly visit my Facebook at the link below

https://www.facebook.com/story.quilt.9


Tuesday, April 1, 2014

Fairy Tale Carriage Pouch PDF pattern

I have finished this beautiful pouch for Emi chan. I took some photos and send to her via Facebook, I am really happy to find how excited she was with this fairy tale pouch.  Emi is such a wonderful friend for me. Throughout our 5 years friendship, she will always write and support me on my works, even during her busiest working days.

Here is my carriage pouch, I hope you will like it ^v^.

If you are interested in the pattern, please find it in my Etsy shop 


This pouch is absolutely suitable for children too. 


Rushing and rushing a beautiful princess to the ball.