Showing posts with label Tutorial. Show all posts

Tuesday, March 3, 2020

Quick and easy beginner wallet sewing project, ECO wallet sewing pattern


This is a really cute pouch that is really quick to make and offer  myriad of  uses.  You can use it as a credit card / business card holders, travel wallet, coin purse, light to carry wallet of all time.    Spring holiday is coming soon, if you are looking for something quick for your coming trip, here's a good wallet project for you.
Check out this sewing pattern at my Etsy shop or click any of the photos below to lead you to my shop. 


Approximate Finished Dimensions (width x height):

4(1/2)" x 3(1/4)"


You will need:
• ¼ yard exterior fabric
• colourful scrap fabric for the strap
• ¼ yard lining fabric
• ¼ yard woven fusible interfacing - Pellon SF101
• Optional : 5” x 2 ½ “ of kraft paper, cardboard paper or the like. This material helps to create firmer result to your slot in cover.


Thursday, November 28, 2019

Making An Adjustable Crossbody Bag Strap DIY Tutorial

Adjustable strap is always so handy to have for your tote bag or crossbody bags.  There are many occasions when it’s nice to have a hands-free option, isn’t it ?  I made one for my Wanderer Crossbody bag to allow additional carrying option, please feel free to check it out.


While making my Ruth 2 Way Tote bag, I thought I am going to share this tutorial of making a bag strap that measures 48” (L) x 1” (W), excluding the swivel hooks.  Also I am using cotton weaved belting or strapping in for this tutorial, however, you can opt to choose polyester type.


Refer to photo below, you will need :
2 pieces of swivel hooks , 1”  measured by the inner width
1 piece of slide bucket, 1” measured by the inner width
1 piece of polyester or cotton belting, 56” x 1” (length)


1.  Begin by cutting the belting or strapping, seals the 2 ends with Fray Check (you may also use glue gun or fabric glue in this case), if you are using polyester belting, you may need to melt the 2 ends with open flame (be extremely careful).


2. Weave one end over center bar and under outside edges of slide adjuster. Extend the open end about 2” past the center bar of slide adjuster.  At the same time, mark ½” from the open end as shown in yellow line below.


3. Fold ½” from the open edge as shown below.


4.  Then fold the strap end over center bar of slide bucket.  Line up the strapping edges properly


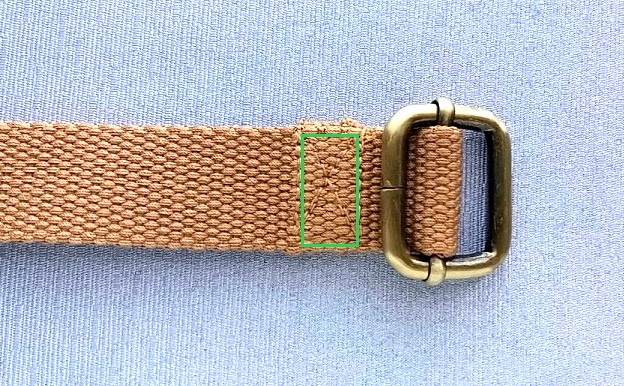
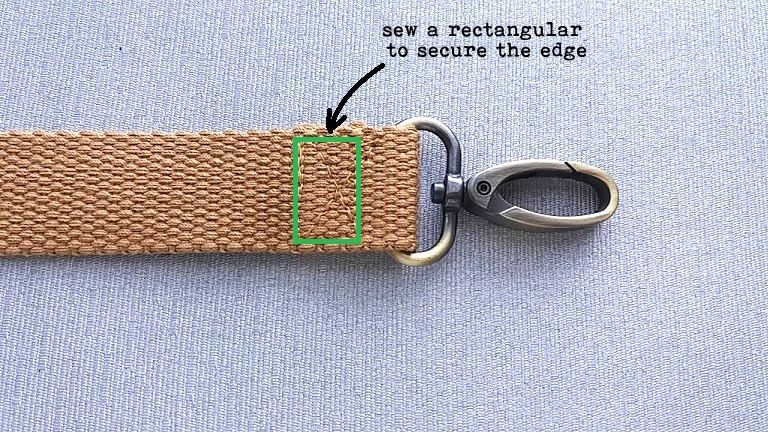
5.  Stitch a narrow rectangle to secure raw end. (green rectangular box in photo below)


6.   Insert other end of strapping through one of the swivel hook, note that the direction of the swivel hook should be at the front side of the strap.


7.  Weave the open end in Step (6) through the slide bucket as shown in photo below.


8. Slide the other piece of swivel through the front side of the strap.


9.  Repeat step (2) to Step (4) onto the swivel this time, all the photos below.


10.  You’re done! You now have an adjustable of your own  ^v^, removable strap that can be used on all kinds of bags and totes.


Thursday, March 15, 2018

How to install rivets


I found this list of photos really good as reference for rivet button installation.  I am translating this tutorial into English for your reference.

Here is one of the rivet / snap closure installer commonly use for leisure project (I am using heavy duty puncher tool though). 


Metal Snap Closure and Dies Set
You will need the following tools to install snap button :
·     A  ( CAP), B (SOCKET), C (POST), D ( STUD), with A & B  and C & D form a pair respectively.  Setter  - a metal stand to hold the snap button to be punched (photo bellow)


·     T1 is used for poking a whole while  T2, T3 (photo below) are the dies tool.  (An awl is also a good tool to poke a hole).


·     A hammer.


Wednesday, February 28, 2018

Shortening your zipper (without zipper tabs version)

 This method to shorten the zipper is intended for projects that do not require fabric tabs at both ends of zipper.
1.      Measure the desired gross length of the zipper for your project.
2.      Mark 2 lines at the both ends of the zipper, with 1 represents the actual length while the other line represents the seam allowance (click to enlarge photo below)


3.      Make sure the zipper puller is within the area you'll use and won't be cut off.
4.      Using zigzag stitch (or hand stitch) at the open end of the zipper, sew a few lines within the seam allowance to close the zipper end.
5.      Trim the excess zipper (click to enlarge photo below)


Sunday, December 3, 2017

New Sewing Pattern : double zipper multipurpose square pouch

This square pouch sewing pattern is designed to provide 2 compartments which is substantial size for your cash and coins, credit cards, lipsticks and compact, keys, or any small daily things you need to grab when you are on the go. It is so simple and quick to make.


♥ double zipper compartments that provide substantial space to keep your credit cards, coins, cash, keys, lipsticks and compact etc in order. And it is super stylish!

♥ multipurpose usage as everyday pouch, night out pouch, cosmetic or gadget organizer (contact lenses) and many other usage. It is also a great gift for your love one! so much ! ^v^ ). 1 pouch for lots of occasion.


All you need is just very simple sewing materials to start. With just very simple twist of front fabric used, you will surely create very beautiful and fashionable style effect pouch using this pattern. 


==========================
APPROXIMATE DIMENSION
==========================

5.5”(w) x 2.5”(H) x 2.5 (D)

You will surely end up loving to make a lot of this pouch, and of course to use it !


To purchase  :  Click on any of the photo above to link you to my Etsy shop or you can always email directly to me at StoryQuilter@gmail.com .


Thursday, February 12, 2015

Hello Kitty clutch Purse with cover sewing pattern

I collected this Hello Kitty linen fabric during my 3rd trip to Tokyo.  I haven’t got any plan what to do with this fabric yet until a friend suggested me to make a wristlet for her. Then I thought of using this Hello Kitty fabric.  I am sure it is going to be a very cute wristlet purse. 

I have got an idea what to do now.  Next is to make a design that match to this cute fabric.  I started to draw my own pattern and the steps required to make this purse to be as easy to make as possible.  To my amazed, my steps are easy, thank GOD !!!   

Hmmm … let see, I think I am going to add a wristlet to it to make this purse even more chic and smart.  I think a decorative Chanel chain would suit this purse perfectly.  So I am making it using a navy blue ribbon.


I just want to make this clutch purse to be as perfect as possible.  Now I am hunting for a Hello Kitty accessory in my accessory drawers …. Yes, found it !!!  This is going to make this purse into a more unique purse. 


Viola !!  Finally !  I am sure
my friend would fall in love to this purse immediately.


Feature of this clutch purse ^v^

Quilted for comfortable hold


Zipper pocket at the front for your coins or card 


Back pocket secured with sticky tape


Inner pocket for organizing your cash, phone or cards


As for the wristlet, it is a very personnel design.  As a result, my pattern won’t cover this step.  However if you have a ready wristlet, you can always add a little accessory to it.  You can also use it as a key holder as shown below.


Please feel free to visit my Etsy shop also remember to favorite my shop so that you can see more and more update of patterns or handmade goods from my shop, it is just a click at the link below  ^v^


Features of this purse
Quilted for comfortable hold
Inner pocket for organizing your cash, phone or cards
Zipper pocket at the front for your coins or card
Back pocket secured with sticky tape

As for the wristlet, it is a very personnel design.  As a result, my pattern won’t cover this step.  However if you have a ready wristlet, you can always add a little accessory to it.  You can also use it as a key holder as shown below.


If you are interested to purchase this pattern, please feel free to email me at 
StoryQuilter@gmail.com

or visit my Etsy shop at the link below. 

https://www.etsy.com/shop/storyquilt

Thursday, November 27, 2014

Almost done !

I have been finding solution for the handle of this project.  Am thinking a way to present it and can use in multiple way, besides that, the size and design of this handle have to be cute !

Searching through my fabric cabinets for the Japanese sakizome (taupe) right fabric pattern and color, finally this one helps !  phew !! 


Next is the shape of the handle.  To be frank, when designing a new bag pattern, one needs to put in lots of time from designing to completing a beautiful bag.  It is a big challenge, imagine you need to start from scratch, from a piece of paper, to making the pattern and to making the bag.  No wonder designers are paid pretty good price for their works.


 Of course for me over here, the most important thing is, you get something really unique and you don’t see a lot of people carrying almost the same bag as yours.  That makes you so proud, agree ?

I think I should be able to complete this project tomorrow.  Yahoo !!


Thursday, September 18, 2014

Story Quilt's classic vintage clutch purse and pattern

I noticed that a lot of Japanese ladies love to use pretty good size and cute clutch purse when they are having their leisure outings.  The size of the purse is normally big enough to put some cosmetic items such as lipstick and compact powder, money and personnel document, and maybe a smartphone too.  It’s light and easy to carry around.  I like the idea so much (especially when I have shoulder pain sometimes).


With simple twist in the fabrics and clutch frame used, I am able to change the style of the clutch purse to suit my occasion.  Since I have got nice rosy vintage fabric, I prefer to make a vintage clutch purse today.  Hmmm …. Size wise , I have a few 12.5cm clutch frame, let met start with that size of clutch purse.


With just 3 pieces of fabrics for FRONT and INNER sides, and fusible interface or iron on batting and 12.5cm clutch frame, I am able to start my clutch purse project already. This project is just perfect for friends with all level of sewing skills.  And for friends with beginner sewing skill, it is advisable for you to try out clutch purse project, you will surely learn a lot of technique here.

Here is the result of my work, if you are fast enough, you can complete this within the day.  Hope you like my work ^v^


It has a larger opening and good size to put quite a number of goodies 


It is also a way to decorate your dressing table too.  I love the idea of making bag not only for daily use but also, I want it to be a decorative item at home.


If you are interested in this handmade clutch purse or sewing pattern, please feel free to visit my Etsy shop at the link below.


If you are interested to purchase this pattern, please feel free to email me at 
StoryQuilter@gmail.com

or visit my Etsy shop at the link below. 

https://www.etsy.com/shop/storyquilt

It’s time for a break !     ♪♫♬


Wednesday, September 3, 2014

Bonjour Paris !! Eiffel Tower Zakka Style Cushion Cover for beginner available in my Etsy

I have been taking these 2 fabrics in and out from my fabric closet many times and always put them back when I can't find any "solution" to the fabrics at all.  And quite luckily, I have got idea to "solve my problem" these few days, without much hesitation, I started to design and sew them within the same day.  

Since I have some request from FB friends to make something nice and easy for beginners from time to time.  I decided to make this cushion into my beginner level pattern. 

If you are new to sewing, it doesn't mean that you can’t make something as cute as those beautiful cushion displayed on the commercial windows.  Take my new Boujour Paris cushion cover pattern as an example, you will surely be amazed that you can actually make it easily.


The pattern is definitely a good learning exercise for you and most of all, you are going to get a nice and stylish cushion to brighten up your room.


If you are interested to purchase this pattern, please feel free to email me at 
StoryQuilter@gmail.com

or visit my Etsy shop at the link below. 


A little introduction to zakka, : Zakka is a fashion and design phenomenon originate from Japan.  Zakka refers to everything and anything that improves your home, life and appearance.  It can range from goodies collected from other countries, from modern colorful goodies to antiques, from kawaii (cute) to  vintage etc).