Thursday, November 28, 2019

RUTH convertible tote bag sewing pattern


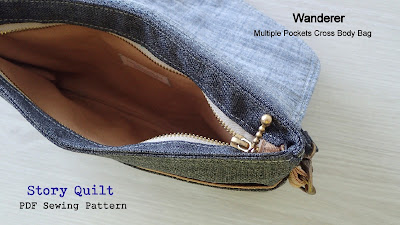
I actually designed this tote bag using a plain denim fabric for my own use.  It is really a nice tote bag to have and really easy and fun to sew during the process of making this tote bag.  I decided to redesign it into a convertible tote with crossbody bag strap and also I am using contrasting fabric print for the front pockets.   I am so thrilled with the result.   Here it is, my new sewing pattern, RUTH convertible tote bag, is available in my Etsy shop now.  Simply click on any photo below to lead you to my Etsy shop ^v^


 It is a mid-sized tote bag (or you can opt to make it as a crossbody bag) that is perfect for everyday use ! It is a fun to sew and functional multiple pockets tote bag (or cross body bag) that is just perfect to store your daily essential. It is perfect for many occasions or seasons, from day-to-day usage, leisure shopping to travelling purpose, a bag for all time. 


It's simple yet sophisticated to carry around. With a little touch of you chosen fabrics (either you can make it plain or a contrasting pockets at the front), you’ll will create a tote bag that you love ! I am owning the denim Ruth tote bag myself now (^v^).


*** SPECIAL FEATURES ***

- Many roomy pockets
*pockets 1 Main zipper pocket
* 1 front zippered pocket for keeping things handy and secure.
* 2 slip pockets at the front for easy store your essential such us sunglass, notepad, keys, access card etc
* 2 slip pockets in the tote bag
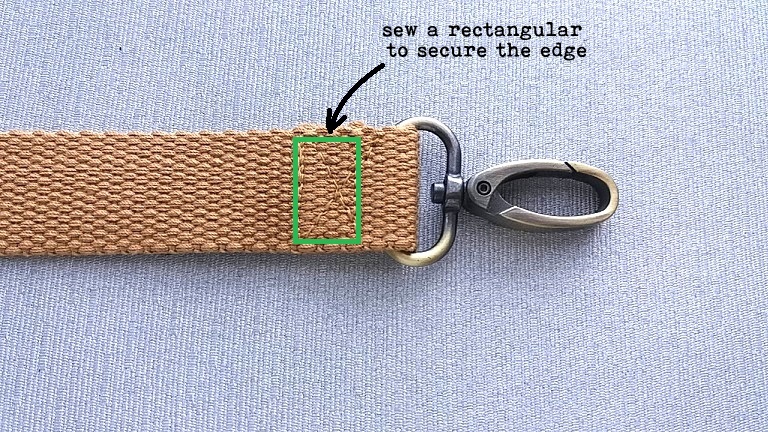
- crossbody adjustable strap ( the sewing pattern provides separate file for making the straw and optional for your download).
- short handles for easy grab and go
- with so many pockets and roomy compartment, you can use it as a project bag too.


*** MATERIALS REQUIRED***

Fabrics and interfacing

• 1 yard exterior fabric
• 1 yard lining
• ½ yard fusible fleece
• 1 fat quarter fusible interfacing
• 1 zipper 13 ½” x 1” width zipper (main compartment)
• 1 zipper 11(½)” x 1” width zipper (front pocket)

For the bag straps :

• 2 pieces of 1” width swivel
• 2 pieces of 1” width D rings
• 1 piece of 1” width slide bucket or strap slider
• 1 piece of 56” (length) x 1” width cotton or polyester belting
• 2 pieces of 2( ½ )” x 1” cotton or polyester belting


The Pattern also provide another instant downloadable page for you to make your own cross body bag strap.  You can use it as a tote or crossbody bag as you like it.


Remember to check it out at my shop ^v^


Making An Adjustable Crossbody Bag Strap DIY Tutorial

Adjustable strap is always so handy to have for your tote bag or crossbody bags.  There are many occasions when it’s nice to have a hands-free option, isn’t it ?  I made one for my Wanderer Crossbody bag to allow additional carrying option, please feel free to check it out.


While making my Ruth 2 Way Tote bag, I thought I am going to share this tutorial of making a bag strap that measures 48” (L) x 1” (W), excluding the swivel hooks.  Also I am using cotton weaved belting or strapping in for this tutorial, however, you can opt to choose polyester type.


Refer to photo below, you will need :
2 pieces of swivel hooks , 1”  measured by the inner width
1 piece of slide bucket, 1” measured by the inner width
1 piece of polyester or cotton belting, 56” x 1” (length)


1.  Begin by cutting the belting or strapping, seals the 2 ends with Fray Check (you may also use glue gun or fabric glue in this case), if you are using polyester belting, you may need to melt the 2 ends with open flame (be extremely careful).


2. Weave one end over center bar and under outside edges of slide adjuster. Extend the open end about 2” past the center bar of slide adjuster.  At the same time, mark ½” from the open end as shown in yellow line below.


3. Fold ½” from the open edge as shown below.


4.  Then fold the strap end over center bar of slide bucket.  Line up the strapping edges properly


5.  Stitch a narrow rectangle to secure raw end. (green rectangular box in photo below)


6.   Insert other end of strapping through one of the swivel hook, note that the direction of the swivel hook should be at the front side of the strap.


7.  Weave the open end in Step (6) through the slide bucket as shown in photo below.


8. Slide the other piece of swivel through the front side of the strap.


9.  Repeat step (2) to Step (4) onto the swivel this time, all the photos below.


10.  You’re done! You now have an adjustable of your own  ^v^, removable strap that can be used on all kinds of bags and totes.


Sunday, October 6, 2019

Volatile Bella Makeup brush roll sewing patterns


One of my to-do list this year.

I found that a lot of daily things we used can easily adapt to volatile concept to achieve a minimalism lifestyle.  My new Bella makeup brush roll bag too.  I designed it in a way I can use it as a makeup brush roll bag, crochet hook or knitting needles bag, and even as an artist roll bag (well, to some extend :p).  It is definitely an ideal bag for your cosmetic brushes and other compact makeup kit wherever you go, daily or on a trip.

The design is cute and fashionable with 2 cute buttons and elastic straps that securely your brushes firmly and no hassle to open the roll bag at all. 
I had so much fun making this brush roll. 

check out this sewing pattern by clicking any of the photos below to lead you to my shop.


                 Features :

• Optimum width when open to store 12 different sizes of brushes and other accessories or compact cosmetic items in just one roll bag. Some of the brush pockets may also hold 2 to 3 small brushes

• 2 elastic hoops attached to 2 buttons elastic closure to create extra strength to further secure your bag roll at the same time. Just 2 simple snap to open and close your bag and your are ready to go.

• flat and compact design, no bulky big roll of bag to carry along.

• Really cute design. Choose your buttons and fabrics (denim, linen, floral print fabrics etc), you will surely create really cute roll bag of your own


• Comes with a tall flap that will easily cover brushes up to 8" tall.


                    Remember to pin these photos to your pinterest board by clicking at the Pinterest buttons below ;) !


Sunday, July 21, 2019

Wanderer cross body bag PDF sewing pattern


How is your summer going ?   It has been a great and wonderful summer for me this year.  My second sister who has been living in Europe for more than 10 years is now back home for long holidays. 


The idea of Wanderer cross body was Inspired by my sister who wish to have a small cross body bag that hold small daily essentials in an organized way. Hence come a small bag with multiple pockets ^v^

This is a fun to sew and functional 2 zippers and multiple pockets cross body bag that is just perfect to store your daily essential. It is perfect for many occasions or seasons, from day-to-day usage, leisure shopping to travelling purpose, a bag for all time and all seasons.


** You can opt to make this bag into a wristlet clutch or a cross body bag too. 

Remember to check it out at my Etsy shop by clicking any of this photo.


FEATURES


- Many pockets to organize small daily essentials (cell phone, key, wallet, lip balm, mini parfum, essential oil, access card etc).

- Small, light and roomy pouch - 1 big zipper compartment to carry your daily essentials such as smartphones, lipsticks, lip balm, mini parfum etc in an organized manner.

- 2 small zipper compartments to hold your handy essential like lip balm, mini parfum, access card, phone, compact powder etc)

- 1 zipper compartment at the back of the bag to secure your essentials at the same time allowing easy access to them.

- suitable for any occasion from daily usage to traveling. You can use it as a clutch or wristlet clutch too.

- multiple ways usage, as a shoulder bag, crossbody bag, or fanny pack (waist bag by sliding the slide ring to the end)


 Depends on your choices, you can opt to  make this bag as a shoulder bag, cross body bag, or fanny pack (waist bag by sliding the slide ring to the end)


The pattern also include the tutorial to make the cross body strap and an optional downloadable tutorial to make a wristlet for this bag. 


Remember to check it out at my Etsy shop. ^v^


Wednesday, April 10, 2019

Preparing dog hook or O ring holder for your bag project

This tutorial how to prepare your dog hook or O ring for your wallet.  Having this tutorial handy will surely help you in your future project


Some of the short form used in this tutorial :

Seam Allowance (SA) :  1/4″ seam allowance throughout unless otherwise stated. All the pattern templates already included seam allowance.
Top press / top stitch / edge stitch: 1/8” for top press
RST  : Right Sides Together
WST : Wrong Sides Together


Steps
1.  Take the prepared fabric pieces.  Arrange so that they are RST (right side together).  Pin in place,


2. Sew at one side by the seam allowance.


3.  Flip the pieces to the front.  Using your finger nail, scratch by the seam to create a crease.


4.  Fold both openings by seam allowance. Pin in place.


5. Top press (1/8”) both edges as shown in photo below.  


6.  Fold the strap into half horizontally.  Slot in the dog hook or O ring.


 7.   Sew it (1/8”) onto your project.


Monday, February 18, 2019

The Essential Zip Pouch, 2 different designs and sizes

Introducing new pattern to my new Etsy Shop, Indigo Stitch Co.  

This is a really  fun and easy to sew, functional multipurpose zip pouches sewing pattern, suitable to all level of sewing.  You can use the big zip pouches as daily clutch, cosmetic, toiletry, travel pouches while the mini zip pouch is perfect for holding long make-up brushes, lip-liners, eye-liners and more! Easily contain little odds and ends for travel or for quick access inside a larger bag.

Create your own zip puller will surely add more character to your work (a bonus zip puller tip will be provided too).  This sewing pattern is perfect to fully utilise your scrap fabrics.


==========================
Dimension
==========================


BIG POUCH - 9.5" (top) x 7.5" (bottom) x 4.5” (H)
SMALL POUCH - 8" (top) x 7" (bottom) x 3" (H)


Check this pattern out from my Etsy Shop by clicking any of the photo here ^v^